Whether you’ve used Screaming Frog’s SEO Spider (one of the must-have SEO tools) before or are just starting to grasp its power you might not have unleashed its full potential yet. Here comes the missing user guide to Screaming Frog SEO Spider you’ll want to share with your colleagues. You’ll learn how to use Screaming Frog with this easy beginner-to-master manual. Fasten your seatbelts, and let’s crawl some websites!
Article Contents
Useful preliminary technical SEO knowledge
Don’t worry if you’re less technically gifted, anyone can crawl websites and draw conclusions. You will have it a little easier, though, if you learn a couple of tricks first.
XPath in Screaming Frog and SEO
Screaming Frog SEO Spider is more than just a crawling software used to glance at automatic canonical and headings reports. We can use XPath expressions (with a handy cheat sheet) to leverage Screaming Frog SEO Spider for more advanced and helpful tasks.
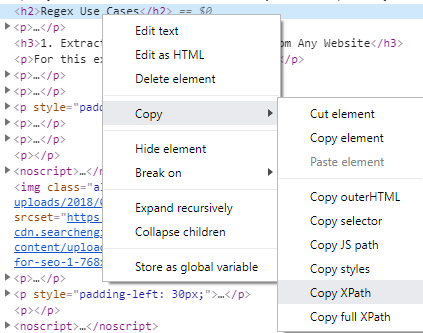
Note that you can use XPath expressions in Chrome DevTools’ search field, among other places, to find hidden header tags, count links and check any other HTML elements.
By right-clicking on a DOM node in DevTools you can also copy its corresponding XPath and use it for scraping, among other things. Remember, though, that it’s automatic and fairly primitive, so there’s usually a need for adjustment to build a universal XPath selector.
Regex in Screaming Frog and SEO
Working with SF SEO Spider you will find that regular expressions (regex) will be very handy, especially when creating crawling exclusion patterns and extracting specific data from HTML.
You need to remember that regex implementations differ from one programming language to the other, and sometimes from one library to another. Sometimes a regex found on Stack Overflow won’t just work. Screaming Frog SEO Spider uses a Java regex implementation, documented in Java docs. Very often, what you find on the Internet, will reference the PCRE (Perl Compatible Regular Expressions) implementation. You need to account for all the differences between them. You can look them up on Wikipedia and regular-expressions.info – here you can choose applicable versions and compare each function.
While working on your regular expressions you might want to keep a cheat sheet handy. For testing, one of the following great regex testing tools will definitely be useful:
- regexr.com,
- regex101.com,
- regexplanet.com – not as great, but uses a Java implementation – the same as Screaming Frog SEO Spider.
Screaming Frog SEO Spider Free vs. Paid Version license
If you’re serious about SEO and crawling, sooner or later you’ll need to get the Paid Version license. While the free version allows for use of most of the basic functions for up to 500 URLs per crawl, some advanced features that are very useful are restricted. When you upgrade you can use all of the crawl modes including List mode, your crawls are limited in size only by your hardware, and you can save all of them for later. There are plenty of other features that you might need, like custom extraction, JavaScript rendering, and various integrations.
Screaming Frog license cost
The cost of a single Screaming Frog SEO Spider license is £149 / year and from my experience, it will pay for itself many times over. If you’re unsure, you can always try the free version first.
How to prepare for a crawl beforehand
Most web hosting providers have built-in crawl and DoS attack prevention systems. Such systems are present at any big SaaS platform like Shopify, Wix, etc. When you have approval from a client to crawl their website you may need to find out if they have this kind of protection turned on, and add your IP address to a whitelist. Otherwise, you will have to use common sense and trial and error to find out what is an acceptable rate for a particular server.
When dealing with other web platforms such as popular CMSes WordPress and PrestaShop you might find that they have security plugins activated that block or rate-limit requests. You should check beforehand with your client (and ask for a whitelist exemption) or attempt to discover a safe rate that will be handled correctly.
Often, when you reach the cut-off threshold the server will respond with 429: Too Many Requests. However, for security reasons servers and applications are sometimes set up to obfuscate the real reason with another error code. If you notice the mentioned response code or other abnormalities during a crawl you should stop it immediately to avoid being black-listed for a much longer period.
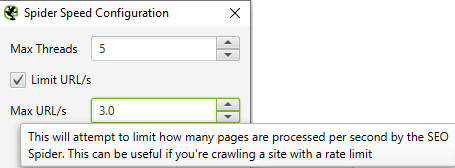
Screaming Frog SEO Spider speed – limiting the crawl rate
If you can’t, for any reason, obtain a whitelist exemption for your IP address you should limit the crawl speed – or request rate – in Screaming Frog SEO Spider in Configuration > Speed. Check Limit URL/s and put in the desired value. Usually, there should be no problem with 1-3 and many servers will handle up to 10 or 15 URLs/s. You need to test it every time, preferably starting with a low value and working your way up.
Remember if you’re getting a 429 response your IP has most probably been banned at the server level for some time. It could be 30 minutes or a couple of hours. During this time, you won’t be able to access the website in your web browser either. You may want to try and use the Opera browser with its built-in VPN or any other VPN you might have access to.
SEO Spider crawl configuration
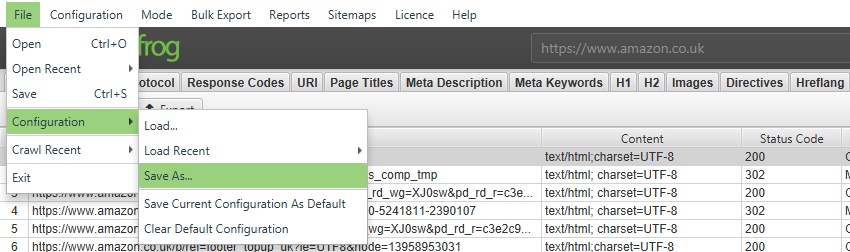
It’s great to use the config save and load feature, especially now that every crawl is saved in a database along with configuration. If you want to make sure that you’re not using the wrong configuration choose File > Configuration > Clear Default Configuration.
Excluding e-commerce filters from crawling
Sometimes e-commerce platforms have problematic filtering configurations, where you can’t optimize each parameter and value pair, and there is a myriad of them. If crawling a nearly infinite number of filter combinations doesn’t sound like a good idea to you, you may need to exclude them in Configuration > Exclude.
If you’re struggling with any specific platform let us know in the comments and we’ll include an exclusion list ready for you to use.
Respecting or ignoring robots.txt and noindex directives during a crawl
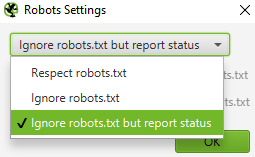
Sometimes you need to crawl w website that’s completely or fully excluded in robots.txt has a sitewide noindex directive set. When this happens you’ll want to change SEO Spider’s settings to ignore them.
You can make the change in Configuration > robots.txt > Settings and Configuration > Spider > Advanced

Excluding parameters in URLs from a crawl
Sometimes URL parameters don’t change anything in the page’s content and are canonicalized, but they are still linked in some places which makes the crawler scan lots of duplicates making some reports useless. In such a case you’ll want to exclude parameters – some or all of them – from crawling in Screaming Frog SEO Spider. You can do this in Configuration > Exclude. You can use a regex that will match any URL string with a question mark in it:
.+\?.*Crawling big websites over 100 000 URLs
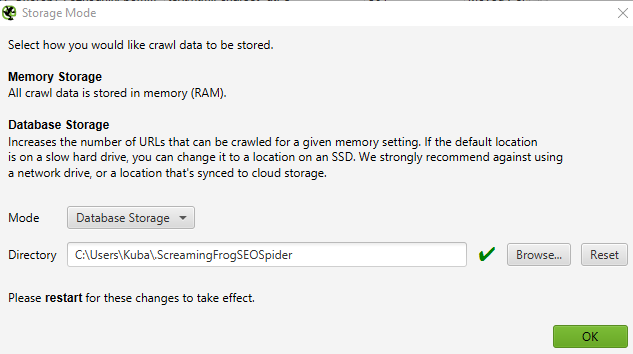
When you want to use the main computer you work on, to crawl big websites it’s best to use the Screaming Frog database storage mode which uses your disk memory more than RAM. Technically you can use disk storage regardless of disk type, but in reality, it will only make sense to use it with an SSD drive. That way you will be able to handle bigger crawls without a major slow-down.
Using database storage mode in SEO Spider
Change Mode to Database Storage in Configuration > System > Storage and choose storage path on an SSD drive if the default points to a slow HDD.
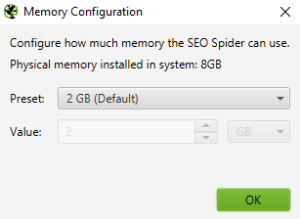
If your machine lacks RAM you can change settings in Configuration > System > Memory and lower the allocated RAM space as needed. The Screaming Frog SEO Spider will always fill up RAM first (because using it is faster) and then start to use disk space.
Automating SEO work with Screaming Frog SEO Spider in examples
If you’re looking for great ways to use Screaming Frog SEO Spider and automate some of your daily SEO tasks this is where you’ll find some inspiration. Let’s look at the many ways you can make your life easier with the SEO Spider.
Screaming Frog SEO Spider List Mode vs. SERP Mode – bulk checking and editing SERP titles and descriptions
Screaming Frog SEO Spider has a built-in SERP mode, which is made to audit your SERP snippets. Thanks to SERP mode you can check titles and meta descriptions that we’re creating, or which we fetch in bulk in the Spider or List modes. You can also edit them as if they were in a spreadsheet with a live snippet preview and export options.
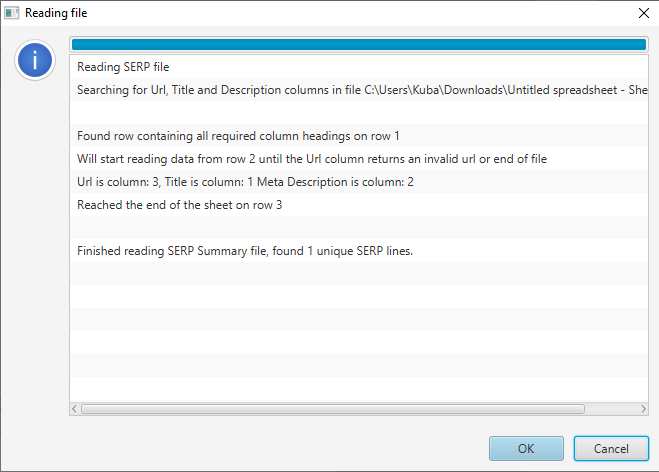
Using SERP mode is as simple as creating a file with 3 columns corresponding to elements for each URL. You can use a spreadsheet template for that and save it as a CSV.
Choose Mode > SERP in Screaming Frog SEO Spider and Upload File. If you’re using a proper template SEO Spider will read all columns and import the data. Remember that URLs need to start with protocol eg. https://.
In the bottom pane, you will be able to see details of the selected row which you can then edit.
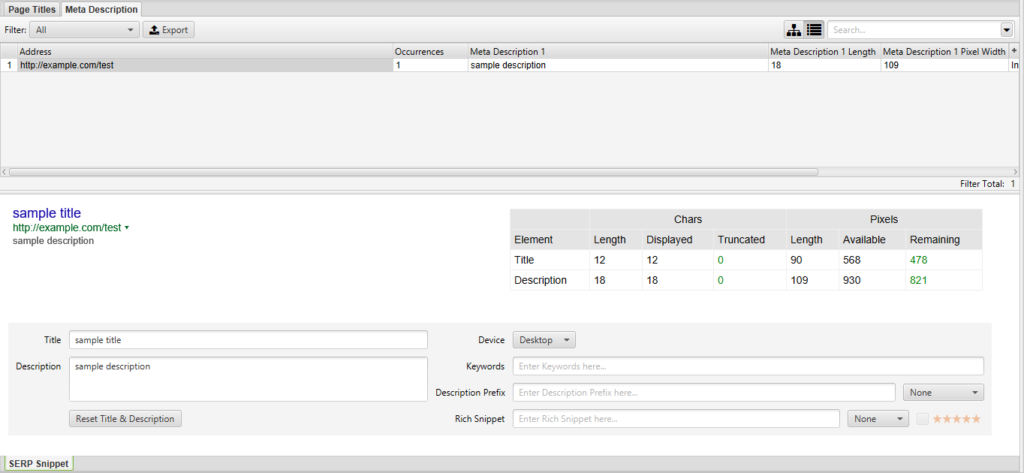
You can also filter the rows using filter tabs as in the Spider and List modes.
When finished, you can export all of the rows of data to a CSV, XLS, or XLSX file.
Sitemap generation with Screaming Frog SEO Spider
Some custom-built websites (be it a CMS or e-commerce) aren’t very SEO-friendly. In fact, sometimes even the most basic features needed to get a website crawled and indexed are missing. Sitemaps are one of those most basic features and when they’re missing or outdated you need to generate them yourself. Luckily SEO Spider can help with that by generating fully compliant sitemaps for both webpages and images.
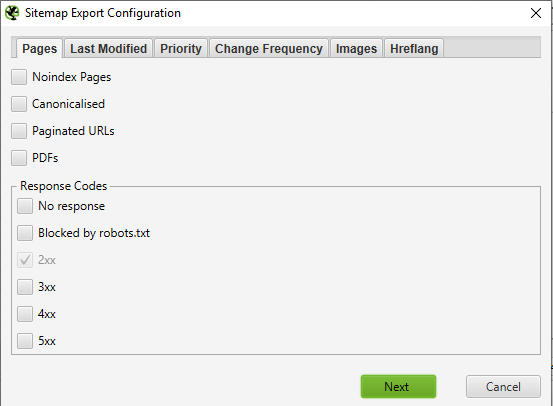
Screaming Frog SEO Spider lets you generate sitemaps after finishing a crawl, in order to do that head to Sitemaps > XML Sitemap or Images Sitemap, and choose desired options.
Remember, you can also use sitemaps to trigger the recrawling of many URLs in bulk, so they’re not something you should forget about.
Crawling URLs found in Google Search Console
Sometimes Google is able to find obscure and arcane URLs that supposedly aren’t linked anywhere, yet they get crawled and indexed. This applies among others to staging and development environments that weren’t sufficiently protected. Screaming Frog and other crawlers don’t have the same superpowers, thus using API integration with GSC comes in handy. Thanks to that integration we can queue for crawling URLs that are found only within GSC, and not in the sitemap or linked somewhere internally or externally.
You’ll find the settings in Configuration > API Access > Google Search Console > General. Before using the integration you’ll have to authorize Screaming Frog with your Google Account and choose the right GSC property in the User Account tab.
Double-checking on-page changes in bulk
When you’re doing lots of on-page optimization at once eg. removing and adding header tags on a myriad of pages, bulk canonical changes, and adding internal links, it’s not uncommon to miss a couple of changes or for some changes no to get saved. It’s a good practice to always double-check any changes implemented on a website.
Manually checking every URL that needed to be changed is very error-prone and tedious so it’s much better to use the List mode in Screaming Frog. Paste a list of URLs and crawl, if your changes go beyond what’s found in the standard reports you can use custom extraction with XPath and regular expressions.
Extracting URLs from sitemaps
If your website isn’t too big you can use Screaming Frog to extract URLs from a sitemap. This isn’t a perfect solution, especially for bigger websites, as the SEO Spider starts crawling extracted URLs as soon as it’s done getting them.
That being said, you can use this method by going to Mode > List > Download Sitemap (Index) and Crawl Analysis > Start. You can see the results in the Sitemaps tab using the URLs in Sitemap filter. To speed things up you can turn off the crawling of any resources such as JS, CSS, SWF, External Links, and Images in Configuration > Spider > Basic, beforehand.
Auditing redirections with Screaming Frog SEO Spider
Sometimes there are massive changes in URLs happening due to platform change, domain change, or user error when clients remove their category tree and it needs to get recovered. In such cases, it’s crucial to audit all of the redirects and check if they’re working as expected. Here’s how to do it:
- We’ll need a list of all of the old URLs. It’s best to use a previous crawl data but in its absence, we can use the site: Google query, Google Analytics or Search Console data, as well as Ahrefs, Web Archive, old sitemaps, server logs, or any other data we can find, so we can compile a complete list.
- We’re going to use the List mode in Mode > List.
- We’ll need to change settings in Configuration > Spider > Advanced to Always Follow Redirects, because Screaming Frog in List Mode, by default, crawls only the URLs that are explicitly provided.
- We’ll input our URL list or sitemap and start crawling.
- Finally, we’ll export Reports > Redirect & Canonical Chains.
A sample Redirect & Canonical Chains report will give you a taste of what valuable information you can obtain using this method.
More coming soon!
Thanks for the awesome content. Much to read but very helpful for the daily practices with the technical challenges. I bookmark your Page.